31. Vhost Sample Application
The vhost sample application demonstrates integration of the Data Plane Development Kit (DPDK) with the Linux* KVM hypervisor by implementing the vhost-net offload API. The sample application performs simple packet switching between virtual machines based on Media Access Control (MAC) address or Virtual Local Area Network (VLAN) tag. The splitting of Ethernet traffic from an external switch is performed in hardware by the Virtual Machine Device Queues (VMDQ) and Data Center Bridging (DCB) features of the Intel® 82599 10 Gigabit Ethernet Controller.
31.1. Background
Virtio networking (virtio-net) was developed as the Linux* KVM para-virtualized method for communicating network packets between host and guest. It was found that virtio-net performance was poor due to context switching and packet copying between host, guest, and QEMU. The following figure shows the system architecture for a virtio-based networking (virtio-net).
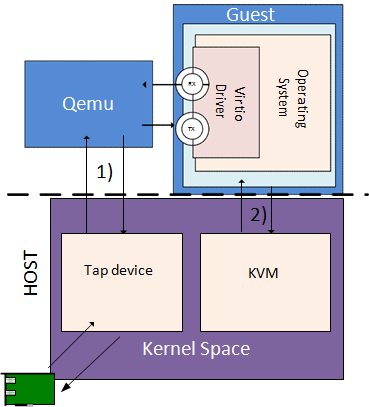
Fig. 31.1 System Architecture for Virtio-based Networking (virtio-net).
The Linux* Kernel vhost-net module was developed as an offload mechanism for virtio-net. The vhost-net module enables KVM (QEMU) to offload the servicing of virtio-net devices to the vhost-net kernel module, reducing the context switching and packet copies in the virtual dataplane.
This is achieved by QEMU sharing the following information with the vhost-net module through the vhost-net API:
- The layout of the guest memory space, to enable the vhost-net module to translate addresses.
- The locations of virtual queues in QEMU virtual address space, to enable the vhost module to read/write directly to and from the virtqueues.
- An event file descriptor (eventfd) configured in KVM to send interrupts to the virtio- net device driver in the guest. This enables the vhost-net module to notify (call) the guest.
- An eventfd configured in KVM to be triggered on writes to the virtio-net device’s Peripheral Component Interconnect (PCI) config space. This enables the vhost-net module to receive notifications (kicks) from the guest.
The following figure shows the system architecture for virtio-net networking with vhost-net offload.
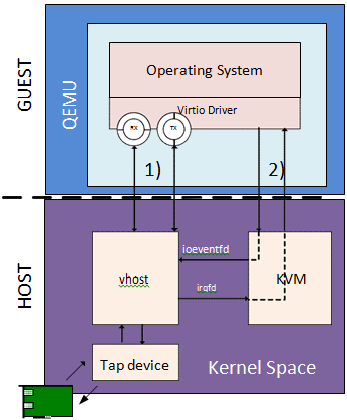
Fig. 31.2 Virtio with Linux
31.2. Sample Code Overview
The DPDK vhost-net sample code demonstrates KVM (QEMU) offloading the servicing of a Virtual Machine’s (VM’s) virtio-net devices to a DPDK-based application in place of the kernel’s vhost-net module.
The DPDK vhost-net sample code is based on vhost library. Vhost library is developed for user space Ethernet switch to easily integrate with vhost functionality.
The vhost library implements the following features:
- Management of virtio-net device creation/destruction events.
- Mapping of the VM’s physical memory into the DPDK vhost-net’s address space.
- Triggering/receiving notifications to/from VMs via eventfds.
- A virtio-net back-end implementation providing a subset of virtio-net features.
There are two vhost implementations in vhost library, vhost cuse and vhost user. In vhost cuse, a character device driver is implemented to receive and process vhost requests through ioctl messages. In vhost user, a socket server is created to received vhost requests through socket messages. Most of the messages share the same handler routine.
Note
Any vhost cuse specific requirement in the following sections will be emphasized.
Two implementations are turned on and off statically through configure file. Only one implementation could be turned on. They don’t co-exist in current implementation.
The vhost sample code application is a simple packet switching application with the following feature:
- Packet switching between virtio-net devices and the network interface card, including using VMDQs to reduce the switching that needs to be performed in software.
The following figure shows the architecture of the Vhost sample application based on vhost-cuse.
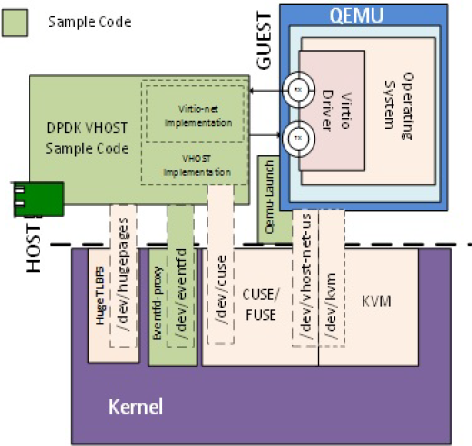
Fig. 31.3 Vhost-net Architectural Overview
The following figure shows the flow of packets through the vhost-net sample application.

Fig. 31.4 Packet Flow Through the vhost-net Sample Application
31.3. Supported Distributions
The example in this section have been validated with the following distributions:
- Fedora* 18
- Fedora* 19
- Fedora* 20
31.4. Prerequisites
This section lists prerequisite packages that must be installed.
31.4.1. Installing Packages on the Host(vhost cuse required)
The vhost cuse code uses the following packages; fuse, fuse-devel, and kernel-modules-extra. The vhost user code don’t rely on those modules as eventfds are already installed into vhost process through Unix domain socket.
Install Fuse Development Libraries and headers:
yum -y install fuse fuse-develInstall the Cuse Kernel Module:
yum -y install kernel-modules-extra
31.4.2. QEMU simulator
For vhost user, qemu 2.2 is required.
31.4.3. Setting up the Execution Environment
The vhost sample code requires that QEMU allocates a VM’s memory on the hugetlbfs file system. As the vhost sample code requires hugepages, the best practice is to partition the system into separate hugepage mount points for the VMs and the vhost sample code.
Note
This is best-practice only and is not mandatory. For systems that only support 2 MB page sizes, both QEMU and vhost sample code can use the same hugetlbfs mount point without issue.
QEMU
VMs with gigabytes of memory can benefit from having QEMU allocate their memory from 1 GB huge pages. 1 GB huge pages must be allocated at boot time by passing kernel parameters through the grub boot loader.
Calculate the maximum memory usage of all VMs to be run on the system. Then, round this value up to the nearest Gigabyte the execution environment will require.
Edit the /etc/default/grub file, and add the following to the GRUB_CMDLINE_LINUX entry:
GRUB_CMDLINE_LINUX="... hugepagesz=1G hugepages=<Number of hugepages required> default_hugepagesz=1G"Update the grub boot loader:
grub2-mkconfig -o /boot/grub2/grub.cfgReboot the system.
The hugetlbfs mount point (/dev/hugepages) should now default to allocating gigabyte pages.
Note
Making the above modification will change the system default hugepage size to 1 GB for all applications.
Vhost Sample Code
In this section, we create a second hugetlbs mount point to allocate hugepages for the DPDK vhost sample code.
Allocate sufficient 2 MB pages for the DPDK vhost sample code:
echo 256 > /sys/kernel/mm/hugepages/hugepages-2048kB/nr_hugepagesMount hugetlbs at a separate mount point for 2 MB pages:
mount -t hugetlbfs nodev /mnt/huge -o pagesize=2M
The above steps can be automated by doing the following:
Edit /etc/fstab to add an entry to automatically mount the second hugetlbfs mount point:
hugetlbfs <tab> /mnt/huge <tab> hugetlbfs defaults,pagesize=1G 0 0
Edit the /etc/default/grub file, and add the following to the GRUB_CMDLINE_LINUX entry:
GRUB_CMDLINE_LINUX="... hugepagesz=2M hugepages=256 ... default_hugepagesz=1G"
Update the grub bootloader:
grub2-mkconfig -o /boot/grub2/grub.cfgReboot the system.
Note
Ensure that the default hugepage size after this setup is 1 GB.
31.4.4. Setting up the Guest Execution Environment
It is recommended for testing purposes that the DPDK testpmd sample application is used in the guest to forward packets, the reasons for this are discussed in Running the Virtual Machine (QEMU).
The testpmd application forwards packets between pairs of Ethernet devices, it requires an even number of Ethernet devices (virtio or otherwise) to execute. It is therefore recommended to create multiples of two virtio-net devices for each Virtual Machine either through libvirt or at the command line as follows.
Note
Observe that in the example, “-device” and “-netdev” are repeated for two virtio-net devices.
For vhost cuse:
qemu-system-x86_64 ... \
-netdev tap,id=hostnet1,vhost=on,vhostfd=<open fd> \
-device virtio-net-pci, netdev=hostnet1,id=net1 \
-netdev tap,id=hostnet2,vhost=on,vhostfd=<open fd> \
-device virtio-net-pci, netdev=hostnet2,id=net1
For vhost user:
qemu-system-x86_64 ... \
-chardev socket,id=char1,path=<sock_path> \
-netdev type=vhost-user,id=hostnet1,chardev=char1 \
-device virtio-net-pci,netdev=hostnet1,id=net1 \
-chardev socket,id=char2,path=<sock_path> \
-netdev type=vhost-user,id=hostnet2,chardev=char2 \
-device virtio-net-pci,netdev=hostnet2,id=net2
sock_path is the path for the socket file created by vhost.
31.5. Compiling the Sample Code
Compile vhost lib:
To enable vhost, turn on vhost library in the configure file config/common_linuxapp.
CONFIG_RTE_LIBRTE_VHOST=nvhost user is turned on by default in the configure file config/common_linuxapp. To enable vhost cuse, disable vhost user.
   CONFIG_RTE_LIBRTE_VHOST_USER=y

After vhost is enabled and the implementation is selected, build the vhost library.
Go to the examples directory:
export RTE_SDK=/path/to/rte_sdk
cd ${RTE_SDK}/examples/vhost
Set the target (a default target is used if not specified). For example:
export RTE_TARGET=x86_64-native-linuxapp-gccSee the DPDK Getting Started Guide for possible RTE_TARGET values.
Build the application:
cd ${RTE_SDK}
make config ${RTE_TARGET}
make install ${RTE_TARGET}
cd ${RTE_SDK}/examples/vhost
make
Go to the eventfd_link directory(vhost cuse required):
cd ${RTE_SDK}/lib/librte_vhost/eventfd_linkBuild the eventfd_link kernel module(vhost cuse required):
make
31.6. Running the Sample Code
Install the cuse kernel module(vhost cuse required):
modprobe cuseGo to the eventfd_link directory(vhost cuse required):
export RTE_SDK=/path/to/rte_sdk
cd ${RTE_SDK}/lib/librte_vhost/eventfd_link
Install the eventfd_link module(vhost cuse required):
insmod ./eventfd_link.koGo to the examples directory:
export RTE_SDK=/path/to/rte_sdk
cd ${RTE_SDK}/examples/vhost/build/app
Run the vhost-switch sample code:
vhost cuse:
./vhost-switch -c f -n 4 --socket-mem 1024 --huge-dir /mnt/huge \
 -- -p 0x1 --dev-basename usvhost
vhost user: a socket file named usvhost will be created under current directory. Use its path as the socket path in guest’s qemu commandline.
./vhost-switch -c f -n 4 --socket-mem 1024 --huge-dir /mnt/huge \
 -- -p 0x1 --dev-basename usvhost
Note
Please note the huge-dir parameter instructs the DPDK to allocate its memory from the 2 MB page hugetlbfs.
Note
The number used with the –socket-mem parameter may need to be more than 1024. The number required depends on the number of mbufs allocated by vhost-switch.
31.6.1. Parameters
Basename. vhost cuse uses a Linux* character device to communicate with QEMU. The basename is used to generate the character devices name.
/dev/<basename>
For compatibility with the QEMU wrapper script, a base name of “usvhost” should be used:
./vhost-switch -c f -n 4 --socket-mem 1024 --huge-dir /mnt/huge \
 -- -p 0x1 --dev-basename usvhost
vm2vm. The vm2vm parameter disable/set mode of packet switching between guests in the host. Value of “0” means disabling vm2vm implies that on virtual machine packet transmission will always go to the Ethernet port; Value of “1” means software mode packet forwarding between guests, it needs packets copy in vHOST, so valid only in one-copy implementation, and invalid for zero copy implementation; value of “2” means hardware mode packet forwarding between guests, it allows packets go to the Ethernet port, hardware L2 switch will determine which guest the packet should forward to or need send to external, which bases on the packet destination MAC address and VLAN tag.
./vhost-switch -c f -n 4 --socket-mem 1024 --huge-dir /mnt/huge \
 -- --vm2vm [0,1,2]
Mergeable Buffers. The mergeable buffers parameter controls how virtio-net descriptors are used for virtio-net headers. In a disabled state, one virtio-net header is used per packet buffer; in an enabled state one virtio-net header is used for multiple packets. The default value is 0 or disabled since recent kernels virtio-net drivers show performance degradation with this feature is enabled.
./vhost-switch -c f -n 4 --socket-mem 1024 --huge-dir /mnt/huge \
 -- --mergeable [0,1]
Stats. The stats parameter controls the printing of virtio-net device statistics. The parameter specifies an interval second to print statistics, with an interval of 0 seconds disabling statistics.
./vhost-switch -c f -n 4 --socket-mem 1024 --huge-dir /mnt/huge \
-- --stats [0,n]
RX Retry. The rx-retry option enables/disables enqueue retries when the guests RX queue is full. This feature resolves a packet loss that is observed at high data-rates, by allowing it to delay and retry in the receive path. This option is enabled by default.
./vhost-switch -c f -n 4 --socket-mem 1024 --huge-dir /mnt/huge \
 -- --rx-retry [0,1]
RX Retry Number. The rx-retry-num option specifies the number of retries on an RX burst, it takes effect only when rx retry is enabled. The default value is 4.
./vhost-switch -c f -n 4 --socket-mem 1024 --huge-dir /mnt/huge \
 -- --rx-retry 1 --rx-retry-num 5
RX Retry Delay Time. The rx-retry-delay option specifies the timeout (in micro seconds) between retries on an RX burst, it takes effect only when rx retry is enabled. The default value is 15.
./vhost-switch -c f -n 4 --socket-mem 1024 --huge-dir /mnt/huge \
 -- --rx-retry 1 --rx-retry-delay 20
Zero copy. Zero copy mode is removed, due to it has not been working for a while. And due to the large and complex code, it’s better to redesign it than fixing it to make it work again. Hence, zero copy may be added back later.
VLAN strip. The VLAN strip option enable/disable the VLAN strip on host, if disabled, the guest will receive the packets with VLAN tag. It is enabled by default.
./vhost-switch -c f -n 4 --socket-mem 1024 --huge-dir /mnt/huge \
 -- --vlan-strip [0, 1]
31.7. Running the Virtual Machine (QEMU)
QEMU must be executed with specific parameters to:
Ensure the guest is configured to use virtio-net network adapters.
qemu-system-x86_64 ... -device virtio-net-pci,netdev=hostnet1, \
id=net1 ...
Ensure the guest’s virtio-net network adapter is configured with offloads disabled.
qemu-system-x86_64 ... -device virtio-net-pci,netdev=hostnet1, \
id=net1, csum=off,gso=off,guest_tso4=off,guest_tso6=off,guest_ecn=off
Redirect QEMU to communicate with the DPDK vhost-net sample code in place of the vhost-net kernel module(vhost cuse).
qemu-system-x86_64 ... -netdev tap,id=hostnet1,vhost=on, \
vhostfd=<open fd> ...
Enable the vhost-net sample code to map the VM’s memory into its own process address space.
qemu-system-x86_64 ... -mem-prealloc -mem-path /dev/hugepages ...
Note
The QEMU wrapper (qemu-wrap.py) is a Python script designed to automate the QEMU configuration described above. It also facilitates integration with libvirt, although the script may also be used standalone without libvirt.
31.7.1. Redirecting QEMU to vhost-net Sample Code(vhost cuse)
To redirect QEMU to the vhost-net sample code implementation of the vhost-net API, an open file descriptor must be passed to QEMU running as a child process.
#!/usr/bin/python
fd = os.open("/dev/usvhost-1", os.O_RDWR)
subprocess.call
("qemu-system-x86_64 ... -netdev tap,id=vhostnet0,vhost=on,vhostfd="
  + fd +"...", shell=True)
Note
This process is automated in the QEMU Wrapper Script.
31.7.2. Mapping the Virtual Machine’s Memory
For the DPDK vhost-net sample code to be run correctly, QEMU must allocate the VM’s memory on hugetlbfs. This is done by specifying mem-prealloc and mem-path when executing QEMU. The vhost-net sample code accesses the virtio-net device’s virtual rings and packet buffers by finding and mapping the VM’s physical memory on hugetlbfs. In this case, the path passed to the guest should be that of the 1 GB page hugetlbfs:
qemu-system-x86_64 ... -mem-prealloc -mem-path /dev/hugepages ...
Note
This process is automated in the QEMU Wrapper Script. The following two sections only applies to vhost cuse. For vhost-user, please make corresponding changes to qemu-wrapper script and guest XML file.
31.7.3. QEMU Wrapper Script
The QEMU wrapper script automatically detects and calls QEMU with the necessary parameters required to integrate with the vhost sample code. It performs the following actions:
- Automatically detects the location of the hugetlbfs and inserts this into the command line parameters.
- Automatically open file descriptors for each virtio-net device and inserts this into the command line parameters.
- Disables offloads on each virtio-net device.
- Calls Qemu passing both the command line parameters passed to the script itself and those it has auto-detected.
The QEMU wrapper script will automatically configure calls to QEMU:
qemu-wrap.py -machine pc-i440fx-1.4,accel=kvm,usb=off \
-cpu SandyBridge -smp 4,sockets=4,cores=1,threads=1 \
-netdev tap,id=hostnet1,vhost=on \
-device virtio-net-pci,netdev=hostnet1,id=net1 \
-hda <disk img> -m 4096
which will become the following call to QEMU:
qemu-system-x86_64 -machine pc-i440fx-1.4,accel=kvm,usb=off \
-cpu SandyBridge -smp 4,sockets=4,cores=1,threads=1 \
-netdev tap,id=hostnet1,vhost=on,vhostfd=<open fd> \
-device virtio-net-pci,netdev=hostnet1,id=net1, \
csum=off,gso=off,guest_tso4=off,guest_tso6=off,guest_ecn=off \
-hda <disk img> -m 4096 -mem-path /dev/hugepages -mem-prealloc
31.7.4. Libvirt Integration
The QEMU wrapper script (qemu-wrap.py) “wraps” libvirt calls to QEMU, such that QEMU is called with the correct parameters described above. To call the QEMU wrapper automatically from libvirt, the following configuration changes must be made:
Place the QEMU wrapper script in libvirt’s binary search PATH ($PATH). A good location is in the directory that contains the QEMU binary.
Ensure that the script has the same owner/group and file permissions as the QEMU binary.
Update the VM xml file using virsh edit <vm name>:
Set the VM to use the launch script
Set the emulator path contained in the #<emulator><emulator/> tags For example, replace <emulator>/usr/bin/qemu-kvm<emulator/> with <emulator>/usr/bin/qemu-wrap.py<emulator/>
Set the VM’s virtio-net device’s to use vhost-net offload:
<interface type="network">
<model type="virtio"/>
<driver name="vhost"/>
<interface/>
Enable libvirt to access the DPDK Vhost sample code’s character device file by adding it to controllers cgroup for libvirtd using the following steps:
cgroup_controllers = [ ... "devices", ... ] clear_emulator_capabilities = 0
user = "root" group = "root"
cgroup_device_acl = [
    "/dev/null", "/dev/full", "/dev/zero",
    "/dev/random", "/dev/urandom",
    "/dev/ptmx", "/dev/kvm", "/dev/kqemu",
    "/dev/rtc", "/dev/hpet", "/dev/net/tun",
    "/dev/<devbase-name>-<index>",
]
Disable SELinux or set to permissive mode.
Mount cgroup device controller:
mkdir /dev/cgroup
mount -t cgroup none /dev/cgroup -o devices
Restart the libvirtd system process
For example, on Fedora* “systemctl restart libvirtd.service”
Edit the configuration parameters section of the script:
Configure the “emul_path” variable to point to the QEMU emulator.
emul_path = "/usr/local/bin/qemu-system-x86_64"
Configure the “us_vhost_path” variable to point to the DPDK vhost-net sample code’s character devices name. DPDK vhost-net sample code’s character device will be in the format “/dev/<basename>”.
us_vhost_path = "/dev/usvhost"
31.7.5. Common Issues
QEMU failing to allocate memory on hugetlbfs, with an error like the following:
file_ram_alloc: can't mmap RAM pages: Cannot allocate memory
When running QEMU the above error indicates that it has failed to allocate memory for the Virtual Machine on the hugetlbfs. This is typically due to insufficient hugepages being free to support the allocation request. The number of free hugepages can be checked as follows:
cat /sys/kernel/mm/hugepages/hugepages-<pagesize>/nr_hugepagesThe command above indicates how many hugepages are free to support QEMU’s allocation request.
User space VHOST when the guest has 2MB sized huge pages:
The guest may have 2MB or 1GB sized huge pages. The user space VHOST should work properly in both cases.
User space VHOST will not work with QEMU without the
-mem-preallocoption:The current implementation works properly only when the guest memory is pre-allocated, so it is required to use a QEMU version (e.g. 1.6) which supports
-mem-prealloc. The-mem-preallocoption must be specified explicitly in the QEMU command line.User space VHOST will not work with a QEMU version without shared memory mapping:
As shared memory mapping is mandatory for user space VHOST to work properly with the guest, user space VHOST needs access to the shared memory from the guest to receive and transmit packets. It is important to make sure the QEMU version supports shared memory mapping.
In an Ubuntu environment, QEMU fails to start a new guest normally with user space VHOST due to not being able to allocate huge pages for the new guest:
The solution for this issue is to add
-boot cinto the QEMU command line to make sure the huge pages are allocated properly and then the guest should start normally.Use
cat /proc/meminfoto check if there is any changes in the value ofHugePages_TotalandHugePages_Freeafter the guest startup.Log message:
eventfd_link: module verification failed: signature and/or required key missing - tainting kernel:This log message may be ignored. The message occurs due to the kernel module
eventfd_link, which is not a standard Linux module but which is necessary for the user space VHOST current implementation (CUSE-based) to communicate with the guest.
31.8. Running DPDK in the Virtual Machine
For the DPDK vhost-net sample code to switch packets into the VM, the sample code must first learn the MAC address of the VM’s virtio-net device. The sample code detects the address from packets being transmitted from the VM, similar to a learning switch.
This behavior requires no special action or configuration with the Linux* virtio-net driver in the VM as the Linux* Kernel will automatically transmit packets during device initialization. However, DPDK-based applications must be modified to automatically transmit packets during initialization to facilitate the DPDK vhost- net sample code’s MAC learning.
The DPDK testpmd application can be configured to automatically transmit packets during initialization and to act as an L2 forwarding switch.
31.8.1. Testpmd MAC Forwarding
At high packet rates, a minor packet loss may be observed. To resolve this issue, a “wait and retry” mode is implemented in the testpmd and vhost sample code. In the “wait and retry” mode if the virtqueue is found to be full, then testpmd waits for a period of time before retrying to enqueue packets.
The “wait and retry” algorithm is implemented in DPDK testpmd as a forwarding method call “mac_retry”. The following sequence diagram describes the algorithm in detail.
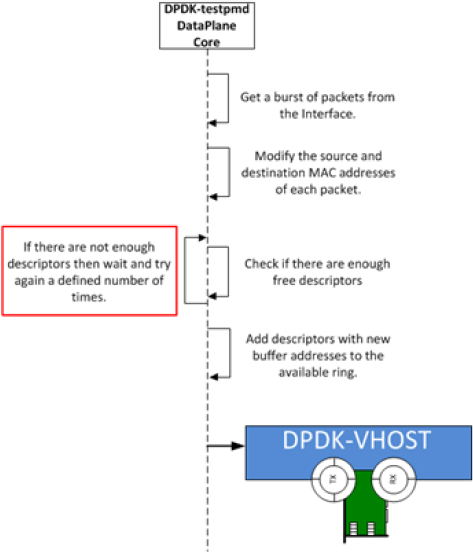
Fig. 31.5 Packet Flow on TX in DPDK-testpmd
31.8.2. Running Testpmd
The testpmd application is automatically built when DPDK is installed. Run the testpmd application as follows:
cd ${RTE_SDK}/x86_64-native-linuxapp-gcc/app
./testpmd -c 0x3 -n 4 --socket-mem 512 \
-- --burst=64 --i --disable-hw-vlan-filter
The destination MAC address for packets transmitted on each port can be set at the command line:
./testpmd -c 0x3 -n 4 --socket-mem 512 \
-- --burst=64 --i --disable-hw-vlan-filter \
--eth-peer=0,aa:bb:cc:dd:ee:ff --eth-peer=1,ff:ee:dd:cc:bb:aa
Packets received on port 1 will be forwarded on port 0 to MAC address
aa:bb:cc:dd:ee:ff
Packets received on port 0 will be forwarded on port 1 to MAC address
ff:ee:dd:cc:bb:aa
The testpmd application can then be configured to act as an L2 forwarding application:
testpmd> set fwd mac_retry
The testpmd can then be configured to start processing packets, transmitting packets first so the DPDK vhost sample code on the host can learn the MAC address:
testpmd> start tx_first
Note
Please note “set fwd mac_retry” is used in place of “set fwd mac_fwd” to ensure the retry feature is activated.
31.9. Passing Traffic to the Virtual Machine Device
For a virtio-net device to receive traffic, the traffic’s Layer 2 header must include both the virtio-net device’s MAC address and VLAN tag. The DPDK sample code behaves in a similar manner to a learning switch in that it learns the MAC address of the virtio-net devices from the first transmitted packet. On learning the MAC address, the DPDK vhost sample code prints a message with the MAC address and VLAN tag virtio-net device. For example:
DATA: (0) MAC_ADDRESS cc:bb:bb:bb:bb:bb and VLAN_TAG 1000 registered
The above message indicates that device 0 has been registered with MAC address cc:bb:bb:bb:bb:bb and VLAN tag 1000. Any packets received on the NIC with these values is placed on the devices receive queue. When a virtio-net device transmits packets, the VLAN tag is added to the packet by the DPDK vhost sample code.
31.10. Running virtio_user with vhost-switch
We can also use virtio_user with vhost-switch now. Virtio_user is a virtual device that can be run in a application (container) parallelly with vhost in the same OS, aka, there is no need to start a VM. We just run it with a different –file-prefix to avoid startup failure.
cd ${RTE_SDK}/x86_64-native-linuxapp-gcc/app
./testpmd -c 0x3 -n 4 --socket-mem 1024 --no-pci --file-prefix=virtio_user-testpmd \
--vdev=virtio_user0,mac=00:01:02:03:04:05,path=$path_vhost \
-- -i --txqflags=0xf01 --disable-hw-vlan
There is no difference on the vhost side. Pleae note that there are some limitations (see release note for more information) in the usage of virtio_user.